Or maybe you've hunched over your surfboard out in the yard until your back aches all in the name of switching that warm water wax to cool water wax come winter time...
I have and being 6'6" sucks when you have nothing sturdy to rest your surfboard on other than the ground and are forced to squat, kneel, sit or stoop in an awkward position.
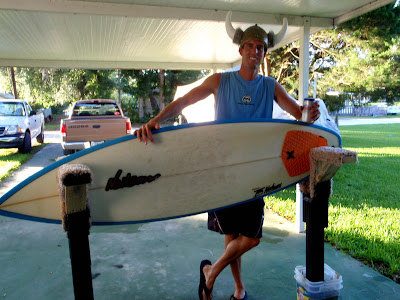
I've seen objects in surfboard shops and in shaper's workshops that work perfectly to hold any size board both horizontally and vertically in a stable manner without risk of damage to the board. By the looks of it, it's not rocket science and to prove it I've out to see how cheaply I could make this object from henceforth I'll call "surfboard horses" for lack of a better name.
Budget $15
What you'll need:

- 3 - Pressure Treated 2x4x8s (if you want to leave outdoors and live in a humid environ like Florida) - cost $2.25 each
- 1 - 60lb bag of ready mix concrete - cost $2.99
- 1 - box of 4.5 inch wood screws 8 count - cost $2
- 1 - box of 3 inch wood screws 20+ count - cost $3
- 2 - 5-gallon style buckets (I used some old cat food buckets bummed from a relative) - cost free
- 3x3' section of carpet (I found some on the trash curb outside a house being remodeled in my neighborhood) cost - free. Note: You could also use large pipe insulation, but unless you can find some it'll cost you more at the hardware store.
- Drill - for screwing in wood screws.
- Circular saw - or something that can gnaw through 2x4 at both 90 and 45 degree angles.
- Tape Measure
- Sharpie Pen or pencil (for marking measurements)
- Razor blade - or perhaps a samurai sword to cut through the carpet
- Shovel & Wheel Barrel with water supply - for mixing concrete (if you're desperate mix the concrete directly in the buckets with a stick or perhaps the samurai sword)
- Staple gun or some roofing nails (to affix the carpet) - free if bummed that roofer friend always in the line up when it's raining because the work day is shot.
- NorsmanViking Helmet - so your neighbors will think you are crazy.
Total $14.74
So let's get to work!

First, a note to Stand Up guys or Paddle Boarders. If you ride anything thicker than 3 inches (the thickness of two 2x4s) near the nose or tail section you may want to modify these instruction for a wider opening so you're board will fit in the vertical position.
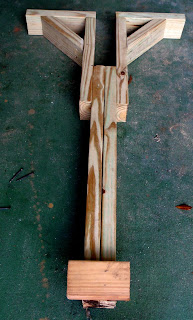
With your circular saw (or 2x4 gnawin' device) cut off two 32 inch sections and use several wood screws to attach them to each other. This will be your post section of the surfboard horse.*


Now cut off two more 18 inch sections of the 2x4s. These will finish off your main surfboard horse post and provide the opening for your board to fit in the vertical position.

Take the two 18 inch sections and place then 7 inches deep along the sides of the main surfboard horse post. Use the long (4.5 inch) wood screws (two in each side) along with several smaller ones to screw the 18 inch sections into the 32 inch main section. See picture.

Cut out two 11 inch sections of the 2x4s.

Now attach these two 11 inch section to the top of your surfboard horse post as shown above at a 90 degree angle with wood screws.

Set your circular saw or 2x4 gnawing device to cut at a 45 degree angle.

Cut out a section of 2x4 with the 45 degree angle. This will be a supporting bracket for the main resting tray.. To ensure a 45 degree cut on both sides correctly line it up after the first cut and draw a line where you want to target your second cut. Pictured left. Repeat until you have two supporting brackets. Screw them in place. See picture below.


Cut off a small section of 2x4 (approx 6 inches) not exceeding the width of your buckets and affix to the bottom of your surfboard horse. This will strengthen the grip the concrete will have on your post. See picture to right.
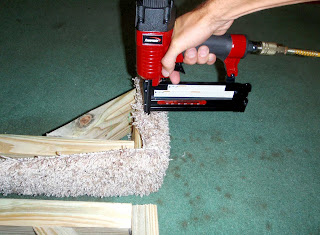
Now cut out a section of your carpet long enough to cover the exposed areas of the surfboard horse that will contact your board (approx 6.5 x 23 inches each) and attach it tightly using your staple gun or roofing nails.

Now repeat the process until you have two surfboard horse posts and drink a beer! You're almost done!

Last step:
Take the ready mix concrete, follow the destructions (I mean instructions) on the bag and mix it with water until it's ready for use.


Once you've done this you are ready to pour. Place surfboard horses into each bucket and use your shovel to slowly pour concrete into bucket around surfboard horse posts. If you have a level you can make sure your horse is straight, if not just eyeball it.


Let concrete set for about a day before using your shinny new surfboard horse. If you can score some spray paint unleash your inner artist upon your creation! Drink another beer and enjoy, you now have surfboard horses!

* Don't forget this is the blog of a tall surfer! If you are less 6'6" tall you may consider shortening the main post size of your surfboard horse from 32 inches to 25 inches or less to ensure the working area is not too high for you.
thanx alot for this post. its helpful specially to all surf newbies like me!, who wanted to repair some dings on their boards.
ReplyDeleteSuch a useful blog.. Thanks
ReplyDeleteSurf's up!!!
Thanks for this blog now I can repair my quiver
ReplyDeleteHelpful with funny commentary! Finally stoked to have'my size' horses... I'm 5'5 and have previously stood on step stools while sanding before...
ReplyDeleteThank you so much! Stoked to get these made.. yew!
ReplyDelete